
How To Create a Continuous Delivery Pipeline for a Maven Project
With Github, Jenkins, SonarQube, and Artifactory | July 6th, 2017
Here at Silicon Valley Data Science (SVDS), we try to optimize our delivery by automating key portions of our software release cycle. This helps our clients avoid a lot of up-front cost when setting up a new data science or engineering project. In order to accomplish this goal, we use some of the continuous delivery automation tools and techniques that have become available in the last few years.
Since Java is one of the most-used languages in our delivery, we’ll walk through creation of a Maven-based Java project here and demonstrate incorporating it into our pipeline.
Requirements
In order to follow along with this exercise, you will need the following:
- A GitHub account to which you have administrative privileges you need this in order to create a successful connection between GitHub and Jenkins
- Jenkins version 2.5 or greater, which we will use as our build system. After the initial installation, install the following Jenkins plugins through the Jenkins ‘Manage Plugins’ interface:
- Artifactory for software artifact management
- SonarQube, which we will use for code coverage and quality calculation
In a production system, you will want to distribute all these services on different nodes and add some redundancy in order to prevent your pipeline from failing during important steps.
Creating the Jenkins Github Organization
In the New Item form, choose the following:
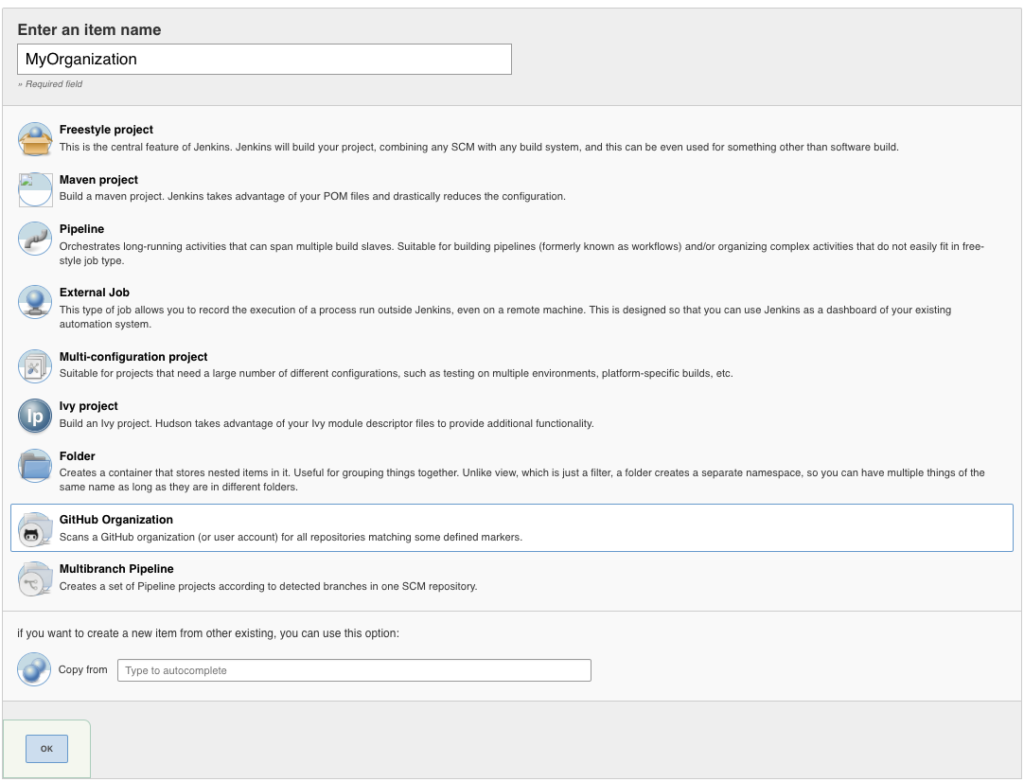
Now we simply connect our organization to our github repository:

Here we have included a credential of one of the administrators for our organization.
At this point, whenever anything gets pushed to any branch of the project and contains a Jenkinsfile in its root, it will get pulled into the organization folder. The plugin re-scans the organization periodically, so typically, there’s no need for a manual re-scan.
It is important to note, as well, that the Organization Plugin automatically configures the Jenkins hooks for you as long as there is correct authorization with the credentials you have provided.
Once the project has been picked up by the organization plugin, you should see something like this in your Jenkins project list:
![]()
Click into this, click on the project, and you should see all the branches inside the project:

From now on, whenever your create a new branch, it’ll automatically show up in this interface and Jenkins will run through the pipeline inside that branch. The organization plugin also detects pull requests from private branches, and runs the pipeline for those in the ‘Pull Requests’ tab above.
Creating the build pipeline
As mentioned, in order for the branch to be detected by the organization plugin, we have to add a Jenkinsfile into the root directory of the project. We will use the declarative version of the pipeline as described here.
First, define the initialization steps—which include defining Maven tool and JDK installation names, the name of which we take from the Jenkins Global Tool Configuration. Here we’ll assume that one had already set up the Maven Plugin inside Jenkins.
We don’t have to define GitHub polling, because the organization plugin takes care of this for us through the Jenkins hook. The Jenkinsfile syntax is a Groovy DSL, so that’s the language you should use for syntax highlighting within your IDE or text editor.
We start with the following:
pipeline {
agent any</code>

tools{
maven 'maven 3'
jdk 'java 8'
}

stages {
stage ("initialize") {
steps {
sh '''
echo "PATH = ${PATH}"
echo "M2_HOME = ${M2_HOME}"
'''
}
}
This allows us to use Maven in the command line steps of our pipeline and defines which JDK to use for the compilation.
We then create the build stage:
stage ('Build project') {
steps {
dir("project_templates/java_project_template"){
sh 'mvn clean verify

}
}
}
Since our Maven project is not in the root directory of our project, we have to use the ‘dir’ block to specify the correct directory to the pipeline.
We will use SonarQube docker container to measure code coverage and quality. Docker makes the installation process extremely easy.
Jenkins provides a plugin for SonarQube—which in turn provides a set of pipeline commands. This is our SonarQube configuration in Jenkins:
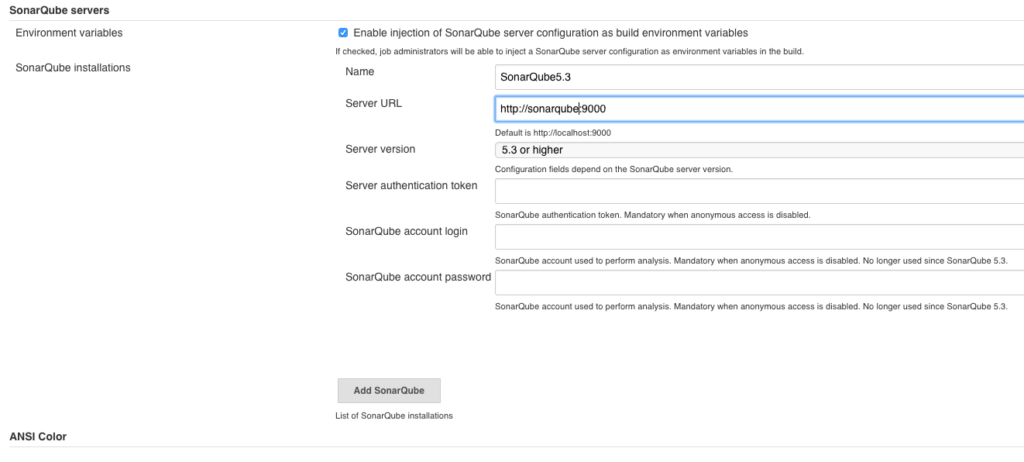
Maven also provides a plugin for SonarQube, which allows us to do the following in our pipeline:
stage ('SonarQube Analysis'){
steps{
dir("project_templates/java_project_template"){
withSonarQubeEnv('SonarQube5.3') {
sh 'mvn org.sonarsource.scanner.maven:sonar-maven-plugin:3.2:sonar'
}
}
}
}
Adding ‘withSonarQubeEnv(‘SonarQube5.3’)’ injects the SonarQube environment into our shell which is executing our maven command. Initially, Maven will take a little longer during this step as it has to pull in all the dependencies required for the SonarQube plugin.
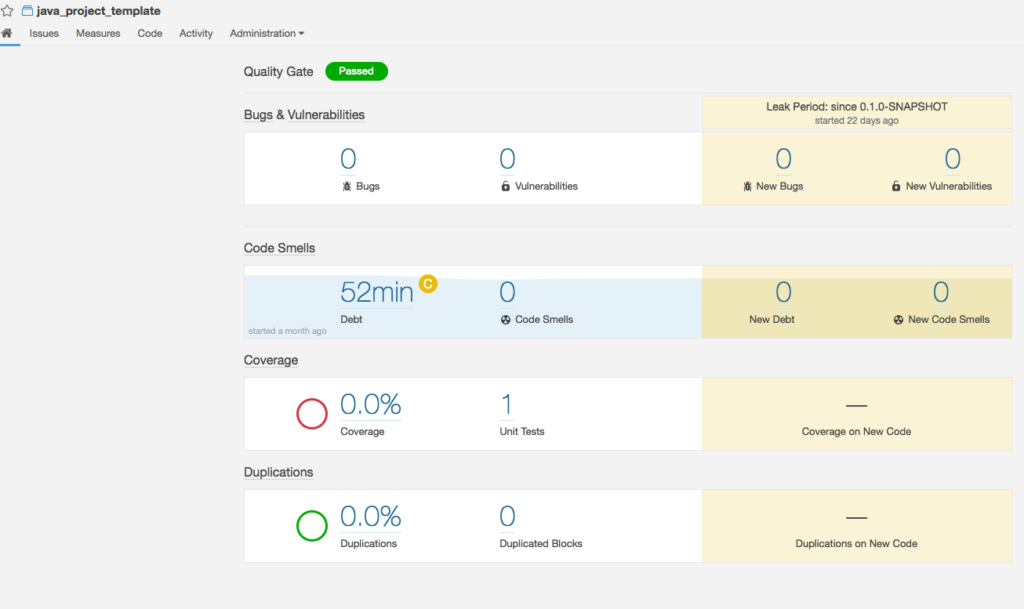
The project will now be automatically picked up by SonarQube and produce the following output:
In Jenkins, we get some nice visuals which allow us to see the state of our coverage and quality:
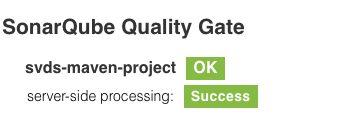
We can set quality and coverage gates, which allows us to prevent a project from building successfully if a certain level of coverage or quality have not been achieved in a specific commit. This configuration is beyond this scope of this blog, but some details can be found here: https://docs.sonarqube.org/display/SONAR/Quality+Gates
Deploying to Artifactory
We’ll use Artifactory for our build artifact management. First, we have to set up the configuration for our Artifactory server within Jenkins configurations:

Including Artifactory deployment steps into the pipeline require bit of Jenkinsfile trickery. Since there’s no Artifactory functionality added to the declarative pipeline syntax, we are required to use a more advanced ‘script’ tag for custom pipeline configuration. We use the below configuration in order to set up our Artifactory environment:
stage ('Artifactory Deploy'){
when {
branch "master"
}
steps{
dir("project_templates/java_project_template"){
script {
def server = Artifactory.server('artifactory')
def rtMaven = Artifactory.newMavenBuild()
rtMaven.resolver server: server, releaseRepo: 'libs-release', snapshotRepo: 'libs-snapshot'
rtMaven.deployer server: server, releaseRepo: 'libs-release-local', snapshotRepo: 'libs-snapshot-local'
rtMaven.tool = 'maven 3'
def buildInfo = rtMaven.run pom: 'pom.xml', goals: 'install'
server.publishBuildInfo buildInfo
}
}
}
}
Here, we are giving the ‘Artifactory’ object full control over our maven goal. This is required because there no equivalent to the ‘withSonarqubeEnv’ tag for Artifactory.
We use the nifty ‘when’ clause in order to make sure that we deploy our snapshot builds only from the master branch, and not any others.
Adding Slack alerts
In order to have oversight over how your pipelines are doing in Jenkins, it’s useful to have good visibility into their build status through integration with your group chat of choice. We use Slack for our internal chat, and therefore will use the Jenkins Slack Plugin. This requires the Slack admin to add a Jenkins hook here.
The Jenkins side of the configuration looks like this:

We then add our slack alerts to the ‘post’ action in our pipeline:
post {
success {
slackSend (color: '#00FF00', message: "SUCCESSFUL: Job '${env.JOB_NAME} [${env.BUILD_NUMBER}]' (${env.BUILD_URL})")

}
failure {
slackSend (color: '#FF0000', message: "FAILED: Job '${env.JOB_NAME} [${env.BUILD_NUMBER}]' (${env.BUILD_URL})")

}
}
This results in  , which we’ve defined in the Jenkins configuration:

in case of success, and like this:
in case of failure. Jenkins has plugins for many other team chat systems like HipChat, Campfire, IRC, etc.
Conclusion
These steps brings us close to a fully-automated Continuous Deployment pipeline. This prevents developers from doing a lot of manual work in order to deploy their artifacts to an environment of their choosing. All a developer of a feature now has to do is push some code to their branch for it to automatically be checked for errors, quality, and coverage. When their pull request is approved and merged into master, this feature makes it all the way to your development repository in an automated fashion.
These developments in build automation tools make it easier than ever to reach the holy grail of a fully automated Continuous Integration/Deployment pipeline with very little configuration and pain along the way.
In a later post, we will discuss the remaining steps necessary in order to release artifacts built with the pipeline to an environment of your choosing. SVDS is also working on Scala- and Python-based Jenkins pipelines, which allow us to deploy artifacts written in those languages with the same ease. We will update with separate blog posts to go into the details of these.


