
Data Ingestion with Spark and Kafka
August 15th, 2017
An important architectural component of any data platform is those pieces that manage data ingestion. In many of today’s “big data” environments, the data involved is at such scale in terms of throughput (think of the Twitter “firehose”) or volume (e.g., the 1000 Genomes project) that approaches and tools must be carefully considered.
In the last few years, Apache Kafka and Apache Spark have become popular tools in a data architect’s tool chest, as they are equipped to handle a wide variety of data ingestion scenarios and have been used successfully in mission-critical environments where demands are high.
In this tutorial, we will walk you through some of the basics of using Kafka and Spark to ingest data. Though the examples do not operate at enterprise scale, the same techniques can be applied in demanding environments.
Prerequisites
This is a hands-on tutorial that can be followed along by anyone with programming experience. If your programming skills are rusty, or you are technically minded but new to programming, we have done our best to make this tutorial approachable. Still, there are a few prerequisites in terms of knowledge and tools.
The following tools will be used:
- Git—to manage and clone source code
- Docker—to run some services in containers
- Java 8 (Oracle JDK)—programming language and a runtime (execution) environment used by Maven and Scala
- Maven 3—to compile the code we write
- Some kind of code editor or IDE—we used the community edition of IntelliJ while creating this tutorial
- Scala—programming language that uses the Java runtime. All examples are written using Scala 2.12. Note: You do not need to download Scala.
Additionally, you will need a Twitter developer account. If you have a normal Twitter account, you can obtain API keys by verifying your account via SMS.
A note about conventions. Throughout this tutorial, you will see some commands that start with a prompt (a dollar sign) and typed in a monospaced font. These are intended to be commands that are run in a terminal. To do this, just copy out the command excluding the prompt, paste it into your terminal, then press the return key.
Prerequisite: verify tools
Run the following commands and check your output against what is expected.
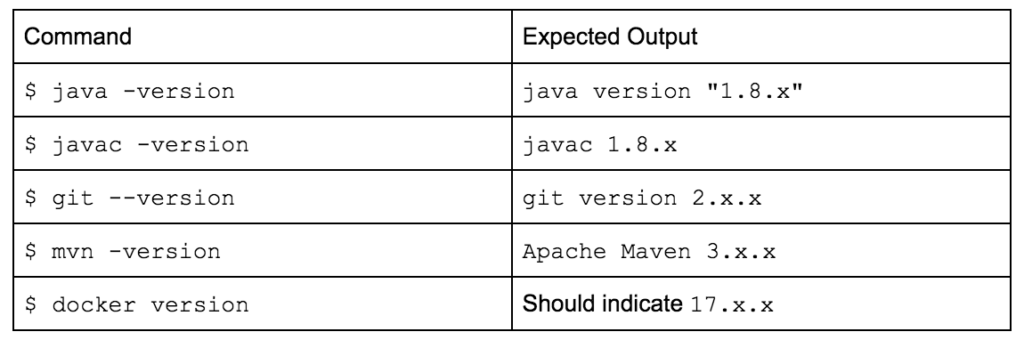
If any of these commands fail with an error, follow the guidelines to install them on your operating system.
Prerequisite: create and configure a Twitter application
To create a Twitter application, navigate to https://apps.twitter.com/. Press the button marked “Create New App.” It will either be on the upper right or middle of your browser window, depending on whether you have created a Twitter app before.
You’ll be asked to fill out several fields, some of which are required. Even though the form indicates that a website is required, you can use a localhost address.
Once you have created the application, you should be redirected to the application configuration screen. Underneath your application name is a row of menu items. Click on the one that says “Keys and Access Tokens.”
At the bottom of this page is a button marked, “Create my access token.” Press it. There should now be a number of fields in your browser window. You only need to be concerned with four of them:
- Consumer Key (in the Application Settings section)
- Consumer Secret (in the Application Settings section)
- Access Token (in the Your Access Token section)
- Access Token Secret (in the Your Access Token section)
You can either copy them into a text file for use later, or leave this browser window open until later in the tutorial when you need the values.
Get the code and compile
The code from this tutorial can be found on GitHub.
Commands:
$ git clone git@github.com:silicon-valley-data-science/ingest-spark-kafka.git
$ cd ingest-spark-kafka
$ mvn clean package
There are two files that will be important for the rest of this tutorial. The first can be found at:
ingest-spark-kafka/src/main/scala/com/svds/blogs/ingest_spark_kafka/TwitterIngestTutorial.scala
It contains stubs that you’ll be filling in later on. The other file to be aware of is:
ingest-spark-kafka/src/main/scala/com/svds/blogs/ingest_spark_kafka/TwitterIngestFinal.scala
It contains the final working version of the code that you should end up with if you work all the way through the tutorial.
Validate Twitter settings
The first thing to do is ensure you have a proper environment that can connect to the Twitter API. Copy the four values from your Twitter application settings into their respective places in ingest-spark-kafka/twitter-secrets.properties.
Next, compile and execute TwitterIngestTutorial. You can run it using your IDE or with maven. To execute it with maven, run the following command (demonstration):
$ mvn package exec:java
-Dexec.mainClass="com.svds.blogs.ingest_spark_kafka.TwitterIngestTutorial"
The output should contain the text “All twitter variables are present” just preceding the line that says “[INFO] BUILD SUCCESS”
Set up a Kafka container
Now that you know your Twitter setup is correct, let’s get a Kafka container up and running. If you have used Docker before, it’s probably a good idea to shut down all of your Docker containers before proceeding, to avoid contending for resources.
IMPORTANT: The Kafka client is picky about ensuring DNS and IP addresses match when connecting. In order to connect, you must create a host file entry that maps a host named “kafka” to the IP address “127.0.0.1” (a.k.a. “localhost”). In Linux/Unix environments, this file is found at /etc/hosts, while on Windows machines it will be at %SystemRoot%\System32\drivers\etc\host. Simply add the following line:
127.0.0.1 kafka
We will use a Kafka container created by Spotify, because it thoughtfully comes with Zookeeper built in. That’s one less technology you will need to become familiar with. Pull down and and start the container this way (demonstration):
$ docker pull spotify/kafka
$ docker run -p 2181:2181 -p 9092:9092 --hostname kafka --name test_kafka --env ADVERTISED_PORT=9092 --env ADVERTISED_HOST=kafka spotify/kafka
Let’s analyze these commands. The first command is simple, it simply downloads the docker image called “spotify/kafka” that has been uploaded to the Docker hub. The next command runs that image locally.
run means that the image will run now. -p 2181:2181 -p 9092:9092 maps two local ports to two ports on the container (local port on the left, container port on the right). Think of this the same way you do a SSH port-forward. --hostname kafka tells the container that its hostname will be kafka; it doesn’t mean anything outside of the container. --name test_kafka gives the container a name. This will be handy if you start and stop the container (as will do momentarily). --env ADVERTISED_PORT=9092 --env ADVERTISED_HOST=kafka pass environment variables into the container runtime environment. These are the same as if you issued an export FOO=’bar’ command from a terminal inside the container. The final parameter is the name of the image to source the container from.
Run some Kafka commands
Next, we’ll stop the container and restart it in background mode. Press “CTRL+C” to stop the container. It should log something about waiting for ZooKeeper and Kafka (the processes!) to die. Restart the container using this command:
$ docker start test_kafka
It should execute quickly. Now we can connect to the container and get familiar with some Kafka commands. Log into the container this way:
$ docker exec -it test_kafka /bin/bash
This is invoking the Docker client and telling it you wish to connect an interactive TTY to the container called test_kafka and start a bash shell. You will know you are inside the container if the prompt changes to something that looks like this:
root@kafka:/#
The first thing we will do is create Kafka topic. A topic in Kafka is a way to group data in a single application. Other message systems call this a “queue”; it’s the same thing. From within the container TTY you just started, execute this command (remember to remove the prompt!):
root@kafka:/# /opt/kafka_2.11-0.10.1.0/bin/kafka-topics.sh --zookeeper kafka:2181 --create --topic test_topic --partitions 3 --replication-factor 1
There’s a lot going on here. Let’s unroll this command. kafka-topics.sh is a script that wraps a java process that acts as a client to a Kafka client endpoint that deals with topics. --zookeeper kafka:2181 tells the client where to find ZooKeeper. Kafka uses ZooKeeper as a directory service to keep track of the status of Kafka cluster members. ZooKeeper also has roles in cluster housekeeping operations (leader election, synchronization, etc.). The client queries ZooKeeper for cluster information, so it can then contact Kafka nodes directly. --create indicates a particular operation that will create a topic. --topic names the topic. --partitions 3 indicates how many partitions to “break” this topic into. Partitions come into play when you to achieve higher throughput. The best information I’ve seen about how to choose the number of partitions is a blog post from Kafka committer Jun Rao. We choose three here because it’s more than one. --replication-factor 1 describes how many redundant copies of your data will be made. In our case that value is just “1” so there is no redundancy at all, though you’d expect this with a cluster that has only one node.
You can verify that your topic was created by changing the command to --list:
root@kafka:/# /opt/kafka_2.11-0.10.1.0/bin/kafka-topics.sh --zookeeper kafka:2181 --list
Now that you have a topic, you can push a few messages to it. That involves a different Kafka script, the console producer.
root@kafka:/# /opt/kafka_2.11-0.10.1.0/bin/kafka-console-producer.sh --topic test_topic --broker-list kafka:9092
--broker-list kafka:9092 is analogous to specifying the ZooKeeper hosts, but specifies a Kafka cluster member to contact directly instead. (I have no idea why kafka-topics.sh does not support this.)
You may think this command is hanging, but in reality it is in a loop waiting for you to send some messages to the topic. You do this by typing a message and pressing the return key. Go ahead and send a few messages to the topic. When you are finished, press CTRL-C.
We can now play these messages back using the console consumer. Use this command:
root@kafka:/# /opt/kafka_2.11-0.10.1.0/bin/kafka-console-consumer.sh --topic test_topic --bootstrap-server kafka:9092 --from-beginning
It takes a few seconds to start up. After that you should see as many messages as you produced earlier come across in the output. CTRL-C will get you out of this application. If you run it again you should see the same output. This is because --from-beginning tells Kafka that you want to start reading the topic from the beginning. If you leave that argument out the consumer will only read new messages. Behind the scenes Kafka will keep track of your consumers topic offset in ZooKeeper (if using groups), or you can do it yourself. You can experiment with this on your own by running the console consumer and console producer at the same time in different terminals.
If you stopped your consumer, please start it again. We will use it later on to validate that we are pushing Twitter messages to Kafka.
Create a Kafka client
Let’s go back to editing TwitterIngestTutorial again. It contains a stubbed-in case class called KafkaWriter. This step will complete it so that we can send messages to Kafka.
First, we’ll add a few configuration properties to the config variable. Add the following lines after the comment that says “add configuration settings here.”
// add configuration settings here.
put("bootstrap.servers", brokers)
put("topic", topic)
put("key.serializer", classOf[StringSerializer])
put("value.serializer", classOf[StringSerializer])
You’ll recognize bootstrap.servers from the console consumer command you just used. It is the same thing except in this case the value is supplied from a string in the constructor. topic should be self-explanatory at this point. The last two values, key.serializer and value.serializer tell the client how to marshal data that gets sent to Kafka. In this case, we have indicated to expect strings.
Next, we’ll modify the write() method to actually send data to Kafka. Above the write() method you can see an instance of KafkaProducer is created. The write() method will use this producer to send data to Kafka. First we’ll create a ProducerRecord, then we’ll use the producer to send() it.
val record = new ProducerRecord[String, String](this.topic, key, data)
producer.send(record).get(5, TimeUnit.SECONDS)
As you see, the record instance is type parameterized to match the types expected by the serializers described by the key.serializer and value.serializer settings. Since producer.send() returns a java.util.concurrent.Future instance, we call get() on it and block until it returns.
This is an example of a synchronous client. Synchronous clients are easier to write, but often do not perform well in highly concurrent (multithreaded) settings. This client could be modified to be asynchronous by introducing a queue and executor pool to KafkaWriter. This is left as an exercise to the reader.
The last step for the Kafka client is to finish the close() method by having it call producer.close().
Spark initialization
There are two steps to initialize Spark for streaming. First you create a SparkConf instance, then you set up a StreamingContext. Place this code after the Twitter validation check:
val conf = new SparkConf()
      .setMaster("local[4]")
      .setAppName("Twitter2Kafka")
val ssc = new StreamingContext(conf, Seconds(5))
In a production scenario, many of the spark configuration values come from the environment, versus specifying here in the code. local[4] tells Spark to use four executors for parallelism. The Seconds parameter in the StreamingContext constructor indicates that our “microbatches” will be five seconds wide.
Input stream
Now we’ll create an input stream to process. The TwitterUtils object abstracts away the Twitter API and gives us a nice DStream interface to data. Essentially, it polls the Twitter API for new events and keeps track of which events have already been processed.
If your job were to create a stream interface into a legacy API in your enterprise, the TwitterUtils class would serve as a good example of how to do it. One important thing to keep in mind with this example is that stream ingestion from Twitter happens in a single thread, and could become a bottleneck and a single point of failure in a production scenario. Concurrently consuming an unpartitioned stream is one of those difficult problems in computer science.
The next few lines of code create the input stream, then repartition it three ways and apply a mapping function so that we are dealing with strings and not Twitter API objects. As a result, the stream will be typed as DStream[(Long, String)].
val stream = TwitterUtils.createStream(ssc, twitterAuth = None,
filters = Seq("#nba", "#nfl", "nba", "nfl"))
      .repartition(3)
      .map(tweet =>; (tweet.getId,
Converters.tweetToBase64(tweet)))
The filters in this case limit us to tweets related to a few sports terms. You can substitute other terms here or pass in an empty Seq to receive the whole data stream.
Stream operations
Once we have a reference to the stream, we can perform operations on it. It is important to make the conceptual distinction that is now happening in this code: while it appears to all live within a single class (indeed a single file), you are writing code that can potentially be shipped to and run on many nodes.
Spark does an okay job of keeping you aware of this. If you ever see a runtime error complaining about a class that is not Serializable, that is usually an indication that you either forgot to mark an intended class as Serializable, or (more likely) you’ve mistakenly instantiated something in the wrong closure—try to push it down a little further. StackOverflow has a wealth of information on this topic.
In order to perform concurrent operations on our stream, we will decompose it into constituent RDD instances and process each individually in the publishTweets() method.
stream.foreachRDD(publishTweets _)
Finally, we’ll kick things off by starting the StreamingContext and telling it to hang around:
ssc.start()
ssc.awaitTermination()
If you run this code, you should see log message that indicate Spark is starting up and processing the stream. Most importantly, you should verify that you see the log message from publishTweets() every five seconds or so.
RDD operations
We repartitioned the input stream earlier, so that we could process chunks of it in parallel at this point. Add the following code to publishTweets(), then run the code.
tweets.foreachPartition { partition =>
      logger.info(s"PARTITION SIZE=${partition.size}")
}
You’ll want to note two things. First, the PARTITION SIZE=X messages appear almost simultaneously. Second, and what’s more interesting, is that they are all running on different threads, indicated by the thread=XXX preamble to the logging messages. Were you running this on a cluster, those messages would likely be output not just on different threads, but on entirely different machines.
Now replace that code with this:
tweets.foreachPartition { partition =>
      val output = KafkaWriter("kafka:9092", "test_topic")
      partition.foreach { record =>
           output.write(record._1.toString, record._2)
      }
      output.close()
}
Do you see how we instantiate each KafkaWriter instance inside the closure that works on the partition? That is to avoid the class serialization problems mentioned earlier.
If you run this code, you should see a lot of output coming across the Kafka console consumer you left running.
Wrapping up
That’s it! Hopefully at this point, you have become familiar with simple Kafka operations and commands and even learned a little bit about how containers can make development easier. Then you learned some simple techniques for handling streaming data in Spark.
Moving on from here, the next step would be to become familiar with using Spark to ingest and process batch data (say from HDFS) or to continue along with Spark Streaming and learn how to ingest data from Kafka. Watch this space for future related posts!